Saturday, June 20, 2015

Room Makeover...Finally!

I've been posting some fun DIY projects that I was making to redo my little sisters bland room. Well, I finally got around to actually REDOING her room!

It turned out fantastic, all thanks to the help of my Grandmother.
Here are some pictures of how all those DIY projects looked together.

BEFORE


What a mess!


AFTER


We chose some bright colors to bring the room some life since we weren't allowed to paint the walls.


It took a long time to get her room in tip-top shape, but we did it and she loved it!
Everyone was so impressed that my brother asked me to surprise him and redo his room as well...haha that is a project for another day!


Nothing like a job well done!


Friday, April 3, 2015

Ticket Stub Display DIY

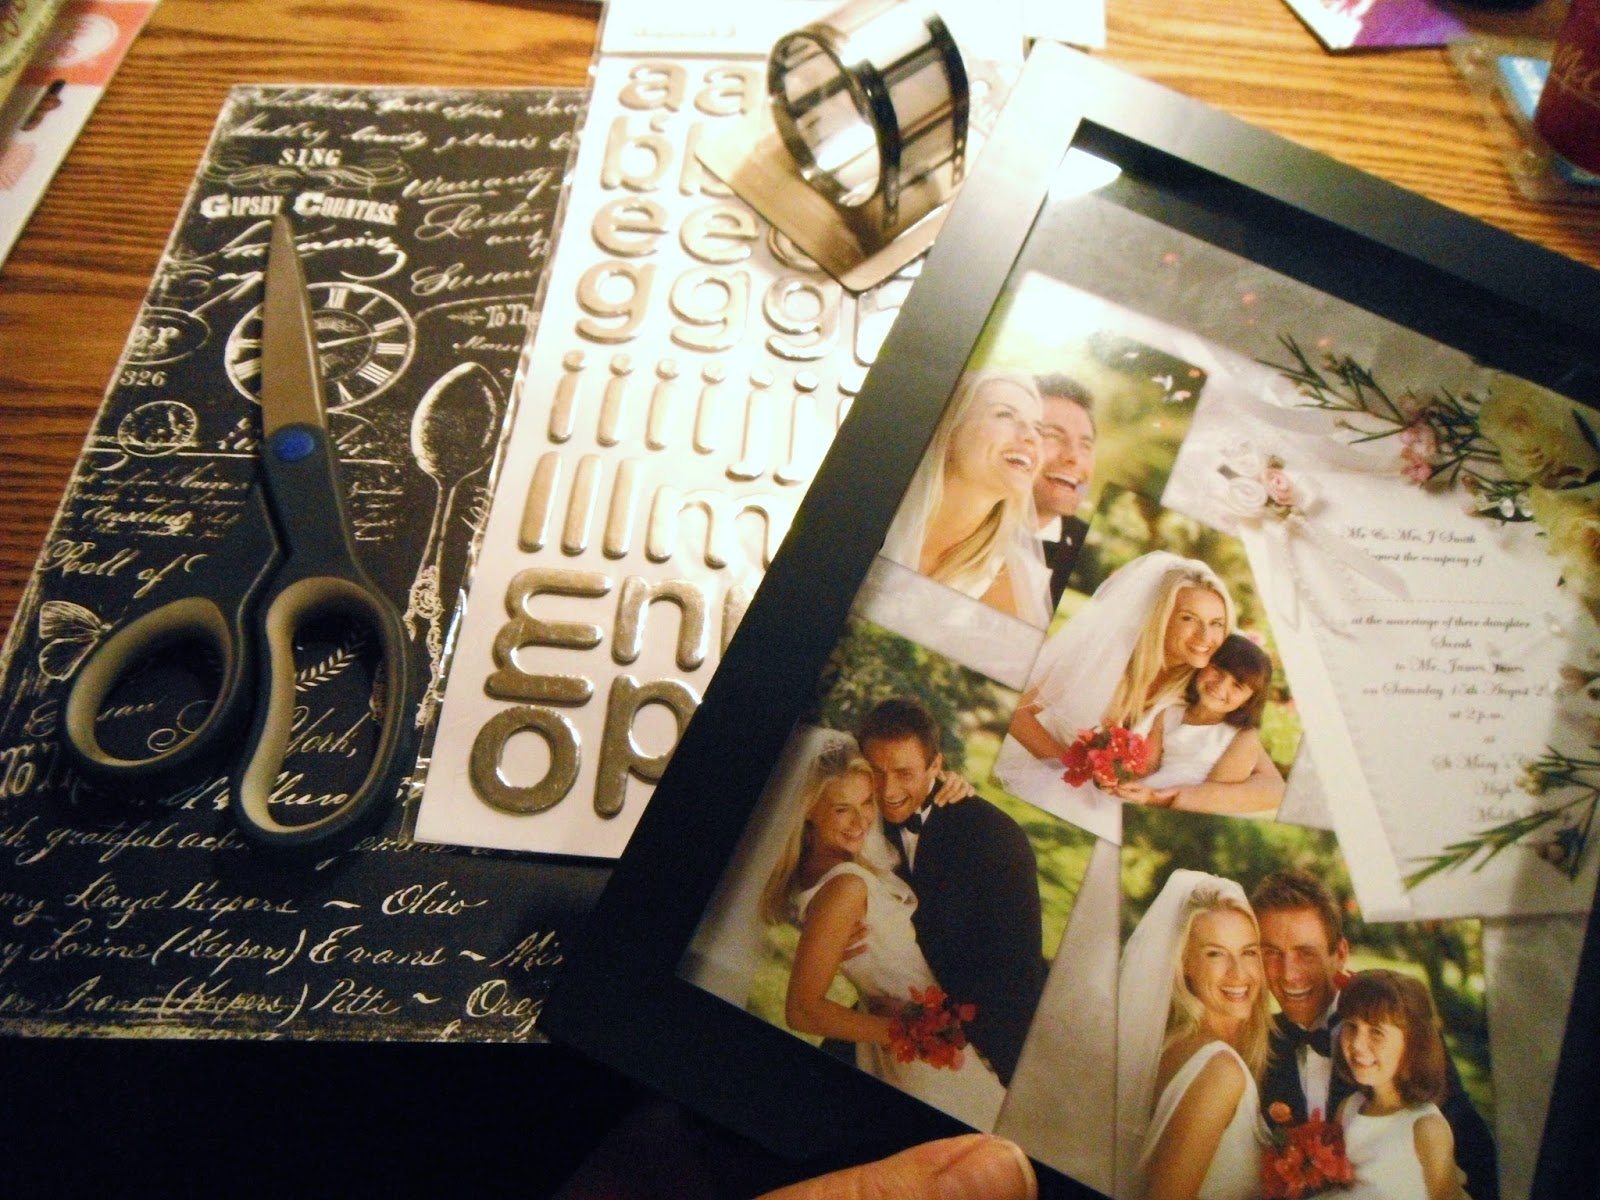
One of my good friends is a collector of ticket stubs, which she keeps in a small box. As a gift, I thought that a ticket display would be perfect for her (and also a fun tutorial).
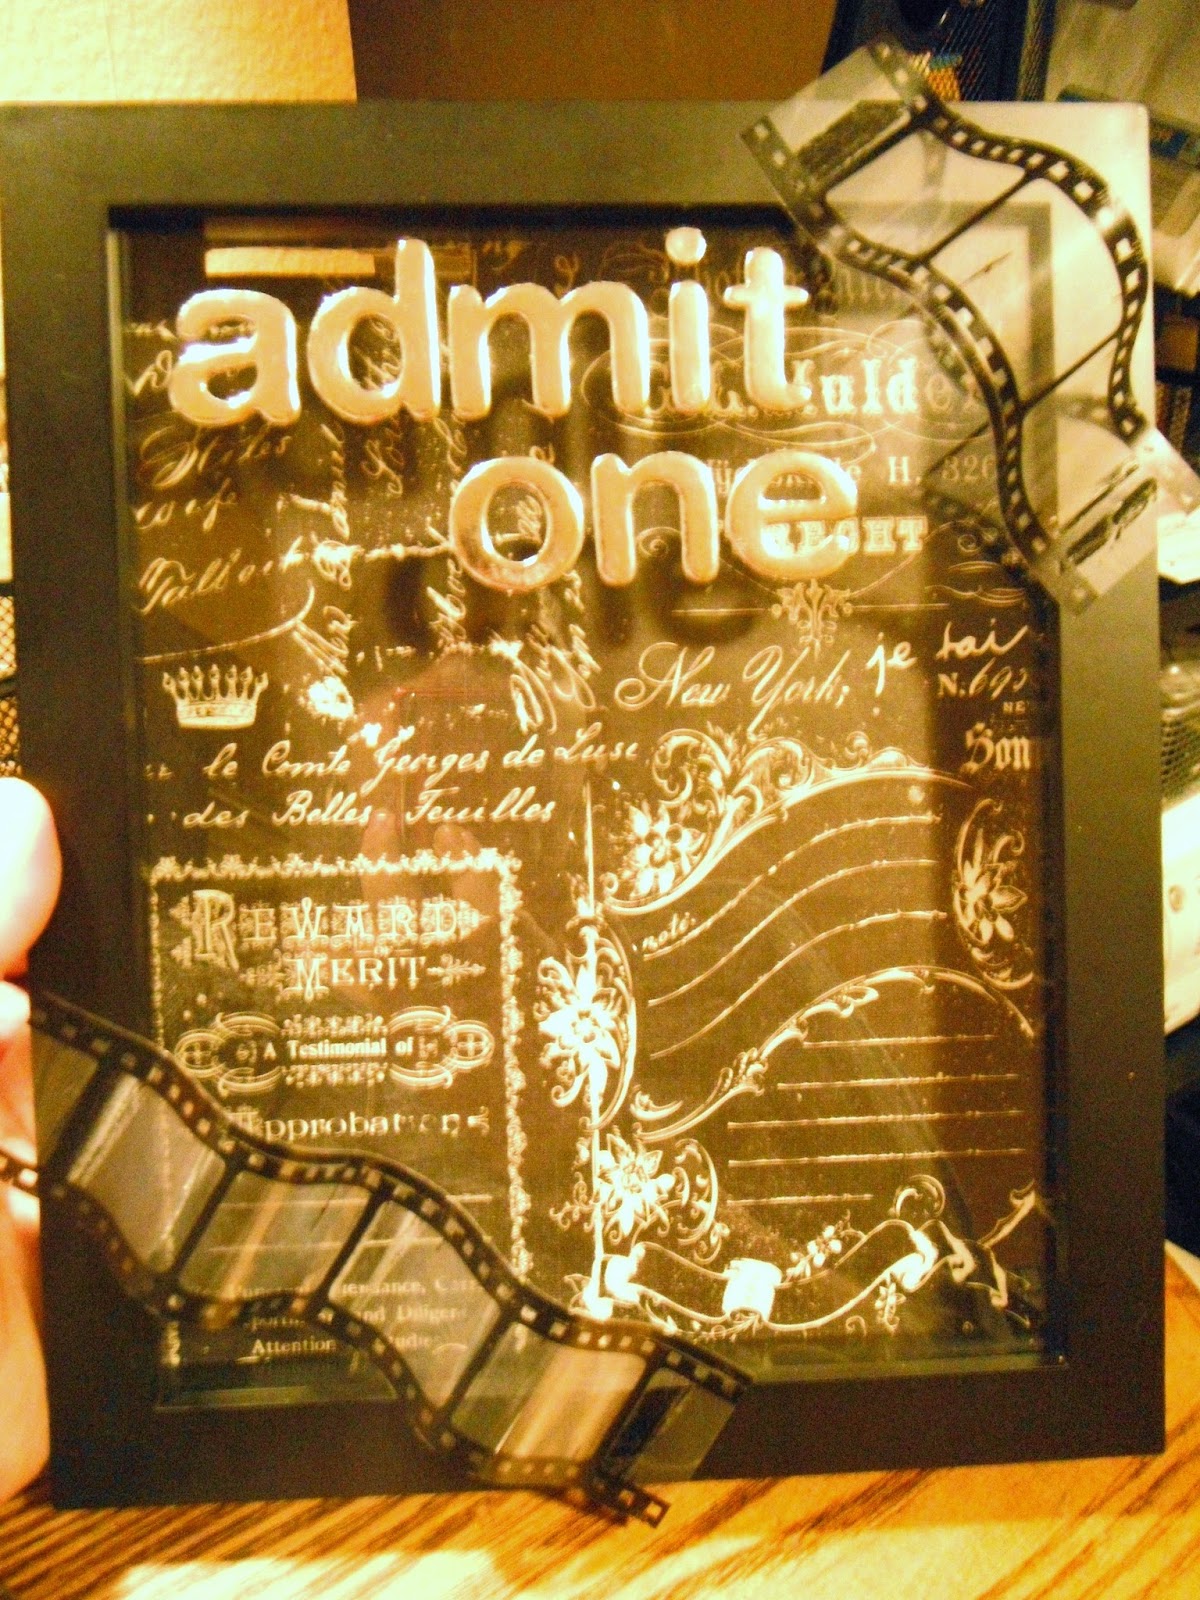
So, this DIY is going to show you how to make a shadow box ticket stub display.


WHAT YOU WILL NEED:
Scissors
Pencil
Shadow box (size of your choosing)
Scrapbook paper (for background)
Letter stickers
Film strip (optional)
Glue (optional)


STEP ONE:
Take out the original picture in the shadow box
 and trace that onto your scrapbook paper with the pencil.
Cut it out.


STEP TWO:
Cut a small slit into the back wall of the shadowbox.


STEP THREE:
Trace and cut the same slit into the scrapbook paper.
(I left the original picture in between the cardboard 
and the scrapbook paper so that I could have 
an easy stencil in case I ever wanted to change 
the background of the shadowbox.)


STEP FOUR:
Put everything together.

(Optional film strip)
Cut a few fun lengths of film strip and glue it to the frame. 
(I did this because she saves movie tickets. These can be made to display all sorts of 
ticket stubs)


STEP FIVE:
Grab your stickers and spell something 
fun for the shadowbox.
Examples:
Admit one
Travels
Plays
Theater
Movies
Memories
Etc...


Pretty simple, don't you think? 
My friend absolutely loved this gift when I gave it to her and has started putting movie ticket stubs in it already. 
I think I'll make one for myself.
:)
Happy Crafting!

Sunday, March 22, 2015

Quotes Worth Hanging On The Wall

I've got another DIY home decor project for you!
I've been seeing fun ideas for DIY canvas quotes for your home and I thought that was perfect for the super secret sister project I'm working on. 
Have you seen the prices on some of those canvas quotes in the stores?
Yeesh.

Don't buy it when you could just make your own!


What you'll need:
Canvas (Whatever size and thickness you'd like)
Paint
Paintbrushes
Ribbon (For flat canvas')
Glue (For flat canvas')
Scissors (For flat canvas')
An inspiring, amazing, awesome quote!


STEP ONE:
Paint the background.
Painting the background of these canvas' was simple. 
First, I painted them a solid color (for example blue)
Then I put dabs of darker blue and white paint in various places on the canvas.
With my paintbrush, I swirled the colors around until it created an effect that I enjoyed.
That's just one idea, you can paint the background anything you like.
Solid colors are great also, very bold.


STEP TWO:
Write the Quote.
This may be tricky when you don't have any ideas for fun fonts.
I simply Googled "fonts" and copied those that I liked.
Don't be afraid to take your time on this step. 
I used a lite pencil first on the canvas to make sure I could fit everything, and then painted it.
Don't be afraid to have fun!
My quotes are all colorful because they are meant to go in a teen room, again, let your creativity lead you while designing your quote canvas.

Many of you will be done at this point.
Congrats! Hang it with pride.

However, if you're like me and bought the canvas' that were on sale and are completely FLAT, then you need to figure out just how you're going to hang these things on the wall.


STEP THREE:
Prepare to hang.
Like I said before, my canvas' were completely flat! How do you hang that on a wall?
Here's one idea.


(This is where your ribbon, glue and scissors come into play!)


Measure your ribbon to be the length of the canvas and cut it.


Grab your glue and apply to both ends of your ribbon.


Stick the glued ribbon to the back of your canvas, as if it were a handle to your purse.


TIP!
Glue at a slight angle.
When you hang your canvas, the ribbon will sometimes pucker if you glue it straight, so I suggest gluing your ribbons at a slight angle.
Trust me ;)
You can even test your ribbon angle by acting as if your finger is a nail and gently pulling on the ribbon before the glue dries.
Make sure to leave the canvas laying on something, you don't actually want to pull the ribbon off, you just want to adjust it!


AND YOU'RE DONE!
Pat yourself on the back for a job well done.

Imagine all the places you could decorate with some fun quotes!
And even better, you can make every one of them unique!
I LOVE IT.

I'd love to see some of your projects or hear from you if you have any other tips on how to hang flat canvas'.

See you next time!

Friday, March 13, 2015

DIY Birthday in PINK!

A few months ago, I was commissioned to help plan, set up and pull off a very pink birthday party for the cutest baby girl who was turning one. 
If you've ever read any of my other posts, you know that pink is not one of my favorites...in fact I tend to stay away from it...far, far away.
That being said, you could imagine my...excitement when I found out this party would be in the brightest pink ever created! 
(I'm still seeing pink when I close my eyes, seriously)
Putting my personal feelings aside, I worked with Keila's mother to create for her an amazing pink birthday party!

First came the dessert table. 
This was the mom's idea that had inspired the entire party, so it had to be good. 


It wasn't easy. I had to look up so many tutorials (I'll try to link them all) and it easily took an hour or two to set everything up. 


(Mine came out slightly different than the YouTube tutorial shows, but mine needed to be hung up instead of stand in a vase ;) )


(They are a little hard to see behind the lollipops)


With the table done, I had to figure out how to match the other items in the room to the table. It turned out, this was going to be a HUGE first birthday party with over 50 people attending (not including kids!)

Keila is an absolute doll and her mother loved to take pictures of her, so I decided to use those to bring out a little more of this girls story.


I put together a cute little photo gallery of all a bunch of pictures of Keila and her family. They were set around the table to bring balance. 
(When you're OCD like me, I can't have anything unbalanced!) 


Next mission was the gift table. 
It had to be big with all these people coming, so I decided to make it another focal point of the room. 


Turns out, it was also the perfect backdrop for guests to come in and get their pictures taken with the birthday girl.


With so many guests on their way, we had to figure out the best way to set the tables so that all this cuteness could be seen!


Our centerpieces were made out of candy glued to a Styrofoam ball and surrounded by tulle.


We hung a lot of fun things from the ceiling to make the tables pop. 
We even hung balloons!


And the final touch would be the Keila's name big and proud for all to see. 


I made these out of cardboard boxes wrapped in wrapping paper. The sparkly letters were cut out of sparkly paper from Hobby Lobby and glued on. They stacked to be taller than me!


This party was one of the largest birthday parties I'd ever planned (other than my sweet 16, but that's another story). The room we had to set this all up in wasn't the greatest to look at, but with all the bright color and large focal items, it worked out pretty great. 
Little Keila had a great birthday party!

And of course, I had a lot of fun too...even with all the pink.

Hope you enjoyed the tutorials and the ideas!

Happy crafting!


Wednesday, February 25, 2015

Modge Podge DIY Teen Room Makeover (part 1)

A few months ago, I dared venture into my little sister, Sara's room. 
She is 16 now, and I was shocked and appalled to find her room had not changed a bit since we were kids! (Definitely not someplace I would like to hang out in if I were a teen)
Since I moved out, that house has turned into a bachelor pad, and it shows. 
My poor sister.


Therefore, I've decided to take it upon myself to give her a secret complete room makeover! 
DIY style.
There was a lot of thought and planning that went into this, and I had to bust out every sneaky ninja move I knew to get information out of her without tipping her off. 
I found out what colors she liked and then it was time for action!
I'm getting some help from my wonderful Grandmother. And together, we've come up with some pretty sweet DIY projects!


Here area few that I remembered to take pictures of, and some of them even have their own tutorials!


Large Name Letters


This DIY isn't too hard to do. We bought a few large letters from Joanne's craft store and I had a bunch of fun paper in the colors we're going to do Sara's room in.


1- Trace the letter onto the paper.
2- Cut it out.
3- Modge Podge the paper to the letter.

Bada-bing-bada-boom!
You've got yourself some fun letters to display on a shelf that any Teen could be proud of. Heck, I'd even hang something like that in my room. :)


Colorful Bulletin Board


I found this bulletin board at a thrift shop. It was pretty banged up, but with a little elbow grease, more fun paper and some modge podge, it looks just like new!
And the best thing is that you can make this in any color you like.


The button push pins happen to have their own tutorial, YAY! 


Colorful Light-switch Plate


I used the same paper that I used to decorate the cork board to make this little beauty.
You would be surprised how adding some color to your light-switch plate can change the feel of a room. It's just too much fun!

This is also a very simple DIY.


I still have more to do, but I think so far, she will love the surprises that we're cooking up for her.
Stay tuned for some more fun DIY room makeover projects.
(Remember, these don't just have to be for a teen room. You can do any of these projects to any of the rooms in the house. Large letters can be used to spell words, not just names.)
Think about it  ;)
Happy Crafting!


Monday, January 19, 2015

3 Easy Steps To Make Cutsie Push-Pins

My sister has a cork board and its a little drab, so I decided to give everything a face lift (without really telling her...it's a surprise. Shh!).
I decided to start small this time, unlike everything else that I attempt haha
So, this post is about making cute push-pins for the cork board that is nearly free.


What you'll need: 
Strong glue (I suggest E600)
Thumb Tacks
Buttons or broken jewelry pieces


Step one: Grab yourself a thumb tack and stick some glue on it!


Step two: Put the glued thumb tack on the back of a button or broken jewelry


Step three: Let dry. (I put mine on plastic in case the glue came through the holes. I let them dry for a few hours.)


TADA!!! 
They will be so fun for a teen room. She's going to love it!
I'm totally thinking of doing some with broken jewelry, like brooches and fun stuff for my cork board.
Oh the possibilities!

Wednesday, November 5, 2014

Steampunk Ha!!oween

This year for Halloween, I decided to go with a Disney Villain for my costume.
That's right, I chose Ursula from the Little Mermaid.


With my choice made, I realized that I was definitely going to have to tweak this character to my liking; I didn't want to do the typical purple skin and crazy white hair. Also, since I was making the costume, I realized I had no idea how to make a tentacle dress. Things looked a little grim for me, but then I got inspiration from Pinterest to put the tentacles in a HAT!

If you know me, you know that I love to make mini top hats! I jumped right on that idea, and began to piece together my costume.

(Me and my coworker, Tyson...poor unfortunate soul.)

There was much touch and go and winging it. 
It's amazing what hot glue can do!


This is what I ended up with for a Sea Witch Mini Top Hat! (It was beat up a little when I took this picture. Ignore the imperfections haha)
Here's the break down to this craziness:
Tentacles were made from wire, gauze, fabric and paint!
I found a cool little skeleton at the Dollar Store as well as some shells at Hobby Lobby.


A little hot glue, a little elbow grease and some magic words and Viola an AWESOME HAT!

Well, my costume didn't stop at the hat (I can't do anything simple). Since I was already going down the Steampunk road, I figured I needed an equally awesome necklace.

If you've ever seen the Little Mermaid, you know that a key piece of Jewelry for Ursula is the shell necklace that she captures Ariel's voice in.
I found a glob of Sculpy and started working my magic.


Clay, paint, chain, shells and beads. 
This lovely piece of art came out better than I had anticipated!

It was a great costume all together and I had a blast making it. 
I won two costume contests and got stopped everywhere that I went so people could check out the hat. 

Can't wait til next year!