Wednesday, November 5, 2014

Steampunk Ha!!oween

This year for Halloween, I decided to go with a Disney Villain for my costume.
That's right, I chose Ursula from the Little Mermaid.


With my choice made, I realized that I was definitely going to have to tweak this character to my liking; I didn't want to do the typical purple skin and crazy white hair. Also, since I was making the costume, I realized I had no idea how to make a tentacle dress. Things looked a little grim for me, but then I got inspiration from Pinterest to put the tentacles in a HAT!

If you know me, you know that I love to make mini top hats! I jumped right on that idea, and began to piece together my costume.

(Me and my coworker, Tyson...poor unfortunate soul.)

There was much touch and go and winging it. 
It's amazing what hot glue can do!


This is what I ended up with for a Sea Witch Mini Top Hat! (It was beat up a little when I took this picture. Ignore the imperfections haha)
Here's the break down to this craziness:
Tentacles were made from wire, gauze, fabric and paint!
I found a cool little skeleton at the Dollar Store as well as some shells at Hobby Lobby.


A little hot glue, a little elbow grease and some magic words and Viola an AWESOME HAT!

Well, my costume didn't stop at the hat (I can't do anything simple). Since I was already going down the Steampunk road, I figured I needed an equally awesome necklace.

If you've ever seen the Little Mermaid, you know that a key piece of Jewelry for Ursula is the shell necklace that she captures Ariel's voice in.
I found a glob of Sculpy and started working my magic.


Clay, paint, chain, shells and beads. 
This lovely piece of art came out better than I had anticipated!

It was a great costume all together and I had a blast making it. 
I won two costume contests and got stopped everywhere that I went so people could check out the hat. 

Can't wait til next year!


Monday, October 6, 2014

Floating Beads Necklace

Not into all that clutter? Have you ever tried what I like to call "Floating Beads"?
The concept is this, instead of filling the entire bead strand with beads, you use crimp tubes to space out your beads.


It pulls together a simple and unique look. Not to mention, you use less beads!


All it takes is a bead mat that you can use to keep the beads in order and the spaces symmetrical.


I love layers, and even a simple piece like this can pull it off. 
Three strands of bead wire, a handful of crimp tubes and a few strands of Blue Moon Beads silver square beads (various sizes).


The technique is simple. I used it all the way through the necklace. 
(Note: If your crimp beads are small and slip right through the hole of the bead, you can add a clear seed bead, or even color if you would like a pop of color)


Why stop at just a necklace? 
Why not make the entire set?


Another fun note: If you use clear wire, it will look like the beads are literally floating. 


Release The Punk Within

Not everyone likes the classic look, or the simple look, or even the bulky look. This project is for those of you who enjoy the "Punk" look. 
Bright colors with an edge.


Everything in this Bracelet/Earring set screams "Look at me!"


And even better, it's super easy to put together.
I picked a few bright beads and stone chips of jasper found in the Blue Moon Beads line.
The metal bows are also their genius creation.
The colors all compliment each other and I absolutely love the difference in textures, it makes for one interesting piece.


I lined it all up on my bead board and then added some stretchy cord for an easy wear bracelet.
The earrings were just as simple; slide a post right through and hook them to earrings.

Rock your inner punk in all sorts of colors!
Let your creativity soar!


Sunday, August 31, 2014

Tree of Life


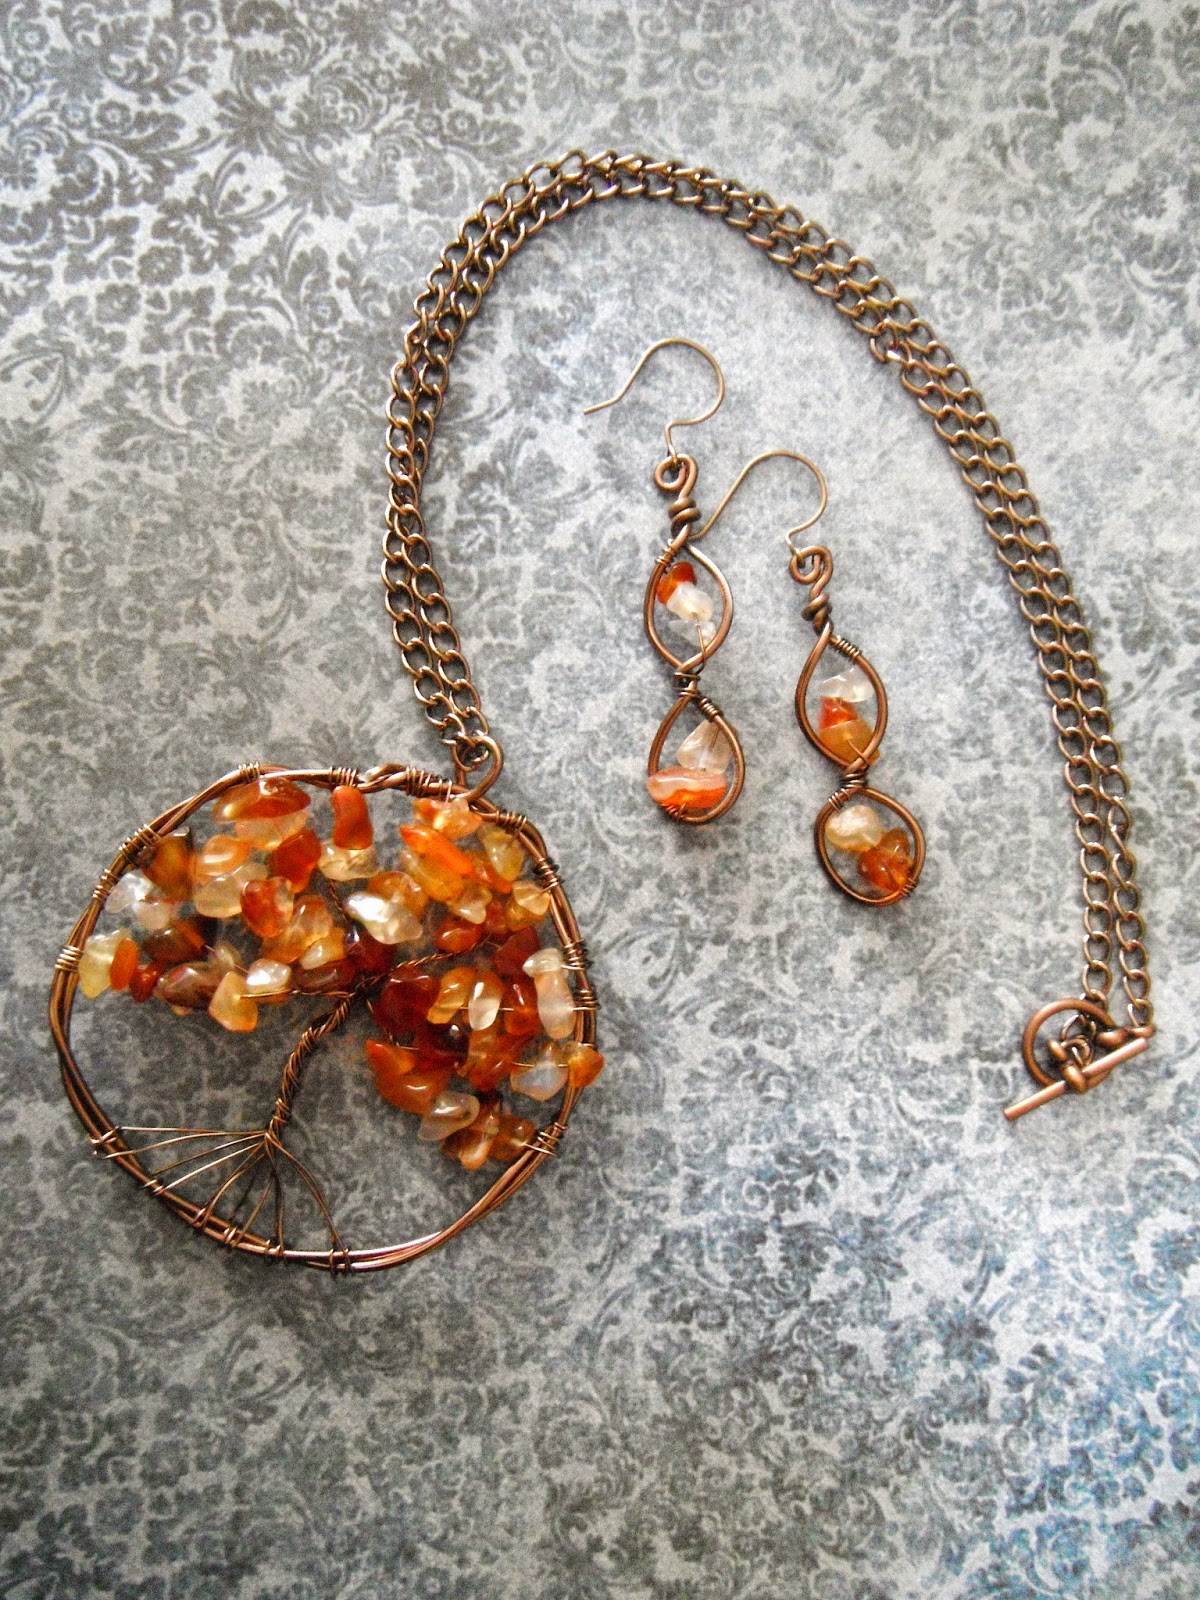
My favorite wire jewelry creation to make is the "Tree of Life".
The idea of the Tree of Life has been used in Mythology, Theologies, and Philosophies about the connection of all life on our planet.
Yeah, the meaning is cool, but making it is also very interesting. Every time I wire one of these bad boys together, it comes out different!

When I saw that Blue Moon Beads had a bunch of stone-chips on sale, I knew what my next project would be!

Two different gauges of wire (usually 18 & 26), chain, stone-ships, a clasp and clippers and you have everything you need for this project.


I've been making trees for a few years now, thanks to a tutorial on You Tube, and love them more and more every time I make a new one. 

There are so many different styles of trees you could make. 
The different color of "leaves" alone are astronomical. 

You could always replace the rock chips with seed beads or pearls. Those make for some unique trees.

For Mother's day one year, I took the birthstones of all the children in my family and made them the colors of the leaves and gave them to my mother. She loved it. It was such a cool concept that a bunch of people at my job wanted me to do that for their moms as well.

Anyway, didn't mean to rant about trees, just wanted you to know how awesome they are!
And now you know :)

If you would like to learn how to make these awesome trees for yourself and would love if I would make a tutorial on how, please comment so below. 
Thanks!


Bold and Loving it!

Hey guys,
I'm sure you've noticed that jewelry has taken on quite a layered and bold look.
I think it's a fantastic style, but some people seem to think that it means you have to wear a piece of jewelry that weighs a million pounds.
Well, I beg to differ.
This bracelet is bold and has layers and guess what? It's comfortable and easy to make!


I grabbed a couple of strands of Blue Moon Beads pearls, large flat beads, and different chains to do the job.

I wanted to create a bracelet that was striking, but also classy enough to wear with any outfit, so I chose a classic color scheme (you can make this in whatever colors you choose, of course).


It was a simple as stringing everything together and adding a clasp. 
I love the texture of the large beads!
The chain and "bling" are an excellent contrast to each other.
All in all, this bracelet eye-catching.


The bracelet is lightweight and comfortable. 
As if that wasn't enough, it doesn't get in the way, like a lot of bold jewelry does.
It goes perfectly with jeans or a skirt.
(I've been wearing it everywhere and been getting compliments all over the place!)

It's too simple not to try, so go out and make one of your own.


Summer Anklet

I love summer and it seems to quickly be steering into the fall season. 
I am in denial and refuse to accept that soon the leaves will be turning and the weather will be chilling. 
So, in honor of my denial, I have made an anklet to go with my shorts and other rebellious summer outfits.


Anklets are so fun because they can range from a simple strand to a few layers, like the one here. 
If you've been a follower of my blog for any amount of time, you probably know that I love layers and use them in anything that I can get away with.


This anklet simply is made strands of cord, clasp and Seed Beads from the awesome and amazing Blue Moon Beads line. 
They offer a large variety of colors, so you can make one for every different summer outfit you own! 


So, join me in this rebellion. Let's hold onto summer for as long as we can!

Tuesday, August 19, 2014

My first Convention!

2014 Salt City Steamfest has come and gone.
And it was AWESOME!
There was so much to take in that it was almost overwhelming, but months of planning finally paid off.


We didn't have much room to set up, but with a little genius (slanting the table), I fit everything on it!
I borrowed some crates to finish the look and they were perfect! 


As my first actual convention, I didn't know what to expect. 
I had read almost every blog about what to bring and how to prepare myself, but there is no way that you could really know what was coming. 

My neighbor booths on either side were interesting.
On one side, a couple who traveled all over the western U.S. selling at shows like this one. They had a little bit of everything, even Vampire killing stakes. Haha
They were so crazy! Every time there was a lull in selling, they would come over to my booth and chat us up about anything and everything. They were definitely characters who just enjoyed the experiences of life.
On the other side, three girls who were a hoot to listen to as they rattled off to entertain each other.
Actually selling was quite an experience in itself. 
Day 1, there were a lot of lookers and no buyers. That was kind of discouraging, but I did make a few sales.


There was a lot to look at on my table. I had a little bit of everything myself. 


When I go to a show, I like to be drawn to the booth. 
Every blog I read said that presentation is everything. 


It was really fun to hear what people thought about the things I had made.
There were all manner of people. 
I even sold a few hats to stuffed animals.


The costumes were so cool. This lady made her own wings and had to walk sideways down the aisles of the marketplace. 


This woman had two pet foxes!
She brought one out with a harness and everything, walking him around the convention.


I was blown away by the creativity of some people at this show.
It was definitely worth the stress and preparation.

I think it would have been fun to go to participate in the actual cosplay games that were going on.
Apparently, we were on a airship and there was an outbreak of a disease that turned players into zombies.

There were a lot of aspect of the show that I wasn't able to check out, as a vendor, but the marketplace was a world in itself.

Now that I'm done and I reflect, I definitely will be making some changes for next year.
Live and Learn.

And now...I'm left with everything that I didn't sell...
If you're interested in checking them out, I've been posting things on my Etsy page every day.
Check it out HERE

Sunday, June 29, 2014

Balance and Understanding


The Buddha stands for understanding the true nature of the mind and the world.
These pendants are available through the awesome Blue Moon Bead line, along with countless other meaningful charms.


I was racking my brain what to pair these little beauties with and finally decided on silver discs, that kind of remind me of balance.


I figure, what better way to show "understanding" then having to carry balance with it.


Steampunk vs Nautical


I haven't ever been a huge fan of Nautical jewelry, but this octopus is the coolest pendant I've seen in a while.


Of course, I had to throw in my own little Steampunk twist on it.
I grabbed a few beads and chain from the Blue Moon Beads line, some gears and a key to make this bad boy.
Basic strategy: I put every bead on its own eye-pin and non-beads were hooked to jump rings. 
Then it was just a matter of measuring chain. 


I wanted a layered look, therefore, I measured a slightly longer chain than my bead/gear strand.
I love things that are a little different, so I off-centered my pendant to be resting just about the collarbone area. 
I think those kinds of necklaces are so cute and you don't see them all over! 
When I was done with the bead and chain strands, I still felt like something was missing and so I made a few dangles to hang from the octopus; it balanced out the necklace very well.


With a necklace so awesome, it needed a companion.
The bracelet was a breeze (compared to the slightly time consuming necklace). 
Same strategy as the necklace; eye-pins for beads and jump rings for gears and then you measure your chain.


Add a clasp and there you go! 
Steampunk meets Nautical meets BEAUTIFUL
I absolutely love this necklace set and guaranteed you won't be seeing anything else like it around.


Tuesday, June 24, 2014

Light-switch Makeover Tutorial

I was rummaging through some of my old junk and found a light-switch plate that I had been meaning to do something with ages ago.
I figured it was time for another tutorial and what better way to spruce up your room than to add a little color in an unexpected place!


For this project you will need:
A Light-switch plate
Scrapbook Paper
Modge Podge
Powerful Glue
Scissors
Pencil
Gems
Random Jewelry Pieces
Rhinestones
Hoops
Chain
What ever else your little heart desires


I found a lot of random jewelry pieces, some beautiful jeweled chain by Blue Moon Beads and some scrapbooking fasteners that I forgot I had. 
This is where you can have some fun! 
I chose to do mine in Black, Silver and Purple because those were the colors of my room. Essentially, you can do any color you fancy!
(It's not important to have a black light-plate. You can have any kind you want)


STEP ONE:
Trace the Light-switch plate on the back of your scrapbook paper. 
Don't forget to trace the hole where the actual light switch goes ;)
And then cut it out! Be sure to leave a little extra space on the sides to curl the paper over the back to make a smooth finish.

(Tip: I used my pencil head to poke small holes in the paper for the screws. It also helps you keep your spacing on track)


STEP TWO:


Before you glue the paper on the light-switch plate, use the flat scrapbook paper to plan out your design. You can try as many variations as you'd like until you have something that you love.

(My finished product had to be adjusted after I began gluing. Keep this in mind)


STEP THREE:
Now that you've chosen your design, carefully set it up on a paper to the side.
Time to bust out your Modge Podge and paint it all over the light-plate.
When done, carefully smooth your scrapbook paper over the glue, being sure to glue the edges, which will want to pop back up.

Modge Podge over the top to give it a nice glossy shine.


STEP FOUR:


When the glue dries, grab out your craft glue, I used E600 (my glue of choice for most of my projects), and start gluing on your design.
Spacing may have changed now that it's shaped to the light-plate, so you will have to adjust your design to fit.
If you look at my original design and my finished product, it's a bit different.
I had to move some things around to make sure that the screws could still get through.
I also happened upon a bunch of black Rhinestones and went to town!
Make sure to glue everything down firmly.
If you have little strings of glue, wait until everything is dry to try to get rid of them.


Viola! You have just created a masterpiece and the best thing is that it's completely unique! 


After everything is dry, screw it into the wall and admire from many angles. Mine fits my personality perfectly! I'm all over the place haha

Hope that inspires some of you to try something new and be a little wild with your creativity.
I'd love to hear about your projects and for what rooms in the house you decided to do this on.

Let your creativity soar!